Translate

Tuesday, June 30, 2015

Blueberry Buttermilk Pancakes


I'm a big pancake person. I love waffles, and french toast, and every other dessert-like breakfast food ever doused in butter and syrup, but pancakes are still on top.

A big stack of (slightly overbrowned) pancakes!
I think it's their versatility. Pancakes are really nothing more, by definition, than any sort of doughy disk cooked in a pan- so there's room for an incredibly diverse range of variations. You've got savoury and sweet, thin and thick, quick-rising, yeasted and unleavened, not to mention the almost infinite flavour and ingredient combinations. Even if you don't change up the pancakes themselves, there's also the huge amount of options for things to top them with. Pancakes of some sort exist in about every culture on Earth, and are all differently delicious.

These, however, are probably the closest thing to the American "default" pancake. When I was a kid I never had fluffy, American-style pancakes unless they were from a box in the freezer section- ours were almost exclusively thin and crêpe-like nalesniki rolled around a filling, or maybe some kind of banana fritter if we had too many brown ones. But the light, syrup-sponging pancakes I'd see on TV as part of the all-American breakfast seemed very exotic.

Needless to say, these are much, much better than any frozen boxed pancake. It took me many attempts to experiment with the much-exalted Martha Stewart recipe for the quintessential buttermilk pancakes until I got just what I was looking for- fluffy, light, tender and ready to absorb insane amounts of maple syrup.

I would recommend looking for "real" buttermilk for these pancakes- not regular milk that's been cultured or curdled with an acid. It really does make a difference, in my books. I used whole fat buttermilk from Organic Meadows, which is my absolute favourite buttermilk available, but use whatever looks to be the highest quality and fat content. I would even try thinning out a good organic sour cream with milk if I couldn't find good buttermilk- the important thing is that the acidity helps leaven the dough (by reacting with the baking powder) and tenderize it by preventing gluten networks from forming. This is also why you need to sift the dry ingredients- to minimize lumpiness, since overmixing the batter to make it completely smooth isn't an option.

You naturally don't need to use blueberries, if they're out of season or you want something different. You can also omit them and make plain buttermilk pancakes, or use chocolate chips. Still, when blueberry season finally hits Southern Ontario, I'm going to be collecting large bagfuls to freeze so that I can make these babies all through the winter. Fresh is obviously better since you can reserve some as a garnish, but you can throw frozen ones into the pancakes just as easily.

I would really, really recommend a nonstick skillet for these if you have one- for ages I suffered with pancakes that stuck regardless of how much oil I used or what the temperature was, or didn't want to cook through properly- a combination of a nonstick pan, medium heat and small pancake size fixed all these issues. You could also use a griddle if you have one, obviously- I didn't. And remember, flip frequently! They cook quickly, and nobody likes a burned pancake. If the surface is cooking faster than the inside, cover the pan with a lid after the first flip.


Lastly, use maple syrup. Not pancake syrup, not "butter-flavoured" syrup. You made these fantastic pancakes, so you deserve the best. And maple is the best.

Blueberry Buttermilk Pancakes
Adapted from Martha Stewart Living

2 C. All purpose flour
3 TBSP Sugar
2 1/4 Tsp. Baking powder
1/4 Tsp. Baking soda
1/2 Tsp. Salt
2 C. Buttermilk
2 Large eggs, yolks and whites separated
2 TBSP Butter, melted
1 TBSP Oil
1 Tsp. Vanilla extract
1 C. Blueberries, fresh or just out of the freezer
Oil or butter, to fry

Mix the flour, salt, baking powder and soda and sift into a large bowl. Stir in the sugar, buttermilk, yolks, butter, oil and vanilla extract- it's alright if it's a bit lumpy.

Beat the whites until firm peaks form and fold into the batter.

Heat a frying pan or skillet (nonstick works best) on medium. Add Use a ladle or 1/4 Cup scoop to dispense batter onto the pan. Drop a few blueberries onto each mound of batter.

Fry about 30 seconds on each side (in the beginning it takes longer since the skillet isn't hot yet) or until golden brown. Keep warm in an 80℃ oven until all the batter is used up.

These are best served with extra fresh blueberries (in season), maple syrup and pats of butter.

Monday, June 29, 2015

Spinach and Mushroom Risotto


Risotto is one of the first vegetarian dishes that come to mind for restaurants and dinner party hosts alike, it seems. Not that it's a bad thing- I'd just never felt inclined to cook it myself because it seemed like such a cliché. (It didn't help that they served some bastardised version of it at my very doomed prom a year back. And it was doomed from the start. It ended with a first fight with the DJ, 'nuff said).

But I found a thing of arborio rice in my cabinet and considered that I may not have given this ricey dish enough credit. I wanted to try it out myself, having white wine on hand as I rarely do.


I mostly stuck to the recipe printed on the rice bag with a few amendments. I made mine vegetarian using good-quality mushroom bouillon cubes (remember to check for MSG, which makes it taste like something from an instant noodle packet. Otherwise use homemade vegetable broth made with a few dried mushrooms or mushroom stems left over from other recipes). I also added spinach for some leafy green goodness (it goes well with creamy foods) and replaced some of the broth with milk (since I'd used light cream where I should've used heavy cream, I wanted to add more dairy someplace else). I reduced the oil and butter simply because it seemed to be enough for my tastes, but double up those amounts if you like it rich. Lastly, I added garlic, oregano and bay leaf as additional seasonings. 


The overall verdict on this recipe was resoundingly positive from everyone who ate it, myself included- if I'd realised how good homemade risotto could be I'd have started making it years ago. 

And if it's cliché... to hell with it, it's a delicious one- and worth trying at home. And the best part is you can cook the rice to just the degree of toothsomeness that you want. It's creamy, aromatic, comforting, and just cheesy enough. Have it with the leftover wine, since you only need a bit for cooking- it's the economical thing to do.


Spinach and Mushroom Risotto

Adapted from the recipe on the back of the Italpasta Arborio Rice bag

1 TBSP Olive oil

1 TBSP Butter
1 Bay leaf
3 Garlic cloves, minced
6 Cremini mushrooms, sliced (boletus would also work nicely if you can get it) 
1 Onion, finely diced
Pinch of salt
1/2 Tsp. Black pepper, freshly ground
1/2 C. Dry white wine
Sprig of fresh oregano, or 2 Tsp. dried oregano
2 C. Arborio rice
4 C. Vegetable stock made with mushrooms (or 4 C. water and 2 mushroom bouillon cubes) 
2 C. Whole milk (or 2% with a splash of cream)
1 Large spinach bunch
1/2 C. Parmesan, grated (or another similar hard sharp cheese)

Heat up half of the butter and olive oil to medium-high in a large skillet. Add the bay leaf and garlic. Cook until beginning to brown, then add the mushrooms and onion, along with the salt and pepper. Sauté until slightly browned, then add the wine. Cook for about a minute, then add the oregano and rice. 


Add the rest of the oil and butter and stir to coat the rice in the fat. Add about half of the stock and let cook covered until completely absorbed before adding the rest of the stock. Cook until somewhat tender, then add the milk and cook uncovered until thickened, stirring. If the rice still seems too firm when the milk is absorbed, add some additional wine or water and mix in.


Chop the spinach coarsely and add. Cover and let the spinach wilt before mixing it in, along with the parmesan. Taste and add additional salt and pepper as desired.

Sunday, June 28, 2015

Banana Coconut Pancakes with Quick Ginger Butterscotch Sauce


I wanted to make a nice Sunday breakfast with only two eggs and no milk- I also had a bag of frozen bananas that had been hanging on my conscience. As a result, this recipe evolved from whatever I had in the kitchen that might go well together.

I didn't have much flour left, but I didn't need a lot- just enough to bind the chunks of banana. I also had an abundance of coconut (it was on sale...), some rum, a bit of sour cream, and a lot of cinnamon. I thought that the somewhat tropical theme in my pantry was too good of a coincidence to not take advantage of.

Sure enough, the flavours all went together fantastically. The texture is also nice, light except for the dense banana chunks, and the coconut giving it a bit of meatiness and rich taste. Normally I'd make banana pancakes with walnuts or chocolate, but here the coconut added plenty enough flavour, along with the warm cinnamon and rum combo.


There's also this ultra-easy butterscotch sauce with ginger. I had a bit of butter and cream, as well as golden syrup, so I thought I'd let it cook while I was frying the pancakes- it makes a fantastic partner, carrying its own spicy notes and adding richness. You won't need extra butter- though it does taste very good paired with roasted almond butter.


One small issue with these types of pancakes is that they sometimes fry on the outside faster than they cook on the inside- that's why I keep the pan covered for the first half of their cooking time, so that before I flip them I can judge if they're sufficiently cooked inside.

Though they're small, these pancakes are nice and filling, and warm one up on a sadistically cold summer's morning (like today). I have plans to use the leftover sauce, along with some other overripe bananas and my coconut cinnamon evaporated milk buns, to make a fantastic and somewhat tropical bread pudding. Ah, efficiency.
Banana Coconut Pancakes
makes about 16 small pancakes

1 - 1 1/4 C. All purpose flour
1 TBSP Cornstarch
1 Tsp. Cinnamon
2 Tsp. Vanilla sugar, or 2 Tsp. sugar and 1 Tsp. vanilla extract
1/2 Tsp. Salt
2 1/4 Tsp. Baking powder
1/4 Tsp. Baking soda
1/2 C. Unsweetened desiccated coconut
2 Eggs
2 TBSP Dark rum
2 TBSP Sour cream
4 bananas, mushed up but still chunky (frozen and thawed works well)
Oil, to fry

Mix 1 C. of the flour, the cornstarch, cinnamon, sugar, salt, baking powder, and baking soda. Sift into a large bowl and whisk in the coconut. Add the eggs, sour cream, rum and bananas. Add as much extra flour as needed to make a thick batter, about as thick as cupcake batter. If your bananas are not very mushy and wet, you may need to add some milk or water instead.

Heat up a large skillet, or your best pan for pancakes, on medium heat. Add some oil and spoon on as many pancakes as will comfortably fit with a 1/4 cup scoop or a large tablespoon. Cover with a lid and let cook about a minute per side, uncovered after flipping once.

Flip the finished pancakes onto a plate lined with paper towels to absorb excess oil and moisture.

Keep warm in an 80℃ oven until all of the pancakes are done.

Quick Ginger Butterscotch Sauce
From Raspberri Cupcakes

30 g. Butter
1/2 C. Dark brown sugar, packed
1/2 C. 18% Cream (pouring cream)
3 TBSP Golden syrup (golden corn syrup will do in a pinch)
1 Tsp. Ginger
Pinch of salt

Mix all in a small saucepan and bring to a boil. Reduce heat and simmer for 10 minutes, or until thickened and smooth. Serve warm.

Tofu Stir-Fry with Thai Eggplants and Basil


Recently I went downtown on a mission- I desperately wanted to find fresh pandan leaves with which to unlock a whole arsenal of Southeast Asian recipes. I went to Chinatown following a lead from Yelp that a store just on Spadina had it- sure enough, I found not only my pandan but also galangal, shrimp-free curry paste, ridiculously cheap lemongrass and some Thai basil and eggplants. Being so elated by my discovery of the pandan leaves, I loaded up on everything that looked interesting with no regard for whether I knew how to cook it or how to get it home.

Yeah, I sometimes get overly enthusiastic about finding new ingredients to use. I'd seen Thai basil before, of course, but never the tiny green Thai eggplants. Since I love eggplant in all shapes and forms, I got a pack and decided to somewhat emulate the Thai basil eggplant I sometimes see on restaurant menus.
A different time I made this using the more readily available Chinese eggplants and fried tofu.
I can't say that I went for authenticity, though. I don't eat fish, so the ubiquitous fish sauce used in Thai cooking was out of the question. I remembered reading somewhere that one could use watered-down hoisin sauce, and while I doubted that would taste anything like the real thing, I did have a bottle of vegetarian hoisin sauce awaiting deployment in the fridge. So, until I found a better fish sauce substitute, that'd do the trick.

While it lacks fermentedness in its flavour, the hoisin does add to the savoury, slightly tangy taste of the sauce, along with some soya sauce to balance it out. I added a couple of dried peppers for heat (fresh would work well, too, but would probably be more pungent) and some garlic, and a little coconut sugar for a sweet note. The sauce isn't overwhelming to the taste of the basil, but still infuses the tofu with flavour well, which was my main objective. You can use fried or unfried tofu- I used fried tofu just recently, so I decided to go with unfried.

Lastly, I added a handful of roasted cashew pieces just because I really like cashews. They add a bit of crunch and extra protein, along with nutty flavour, but you can skip them entirely. I was very happy with how this recipe turned out, since I practically improvised the whole thing based on what was on my fridge. Served with jasmine rice, this makes a quick and delicious meal.

Tofu Stir-Fry with Thai Eggplants and Basil

For the Sauce:
3 TBSP Soya sauce
3 TBSP Hoisin sauce (I used a vegetarian one, naturally)
3 TBSP Water
2 Dried red bird chillies, crumbled into bits
2 Tsp. Coconut, palm or brown sugar

Mix all well and set aside.

For the Tofu and Vegetables:
1 1/2 TBSP Vegetable oil
225 g. (1/2 Lb.) Firm Tofu, cut into bite-sized cubes (or fried tofu)
250 g. (a bit more than 1/2 Lb.) Thai eggplants, cut into halves and quarters (or Chinese eggplants- the long and thin ones)
1 Red bell pepper, cut into thin strips (or a mix of colours)
2 Shallots, cut into thin strips
3-4 Garlic cloves, finely minced
Small bunch of Thai basil, torn into bits, stems removed
Juice of 1/2 a lime
1/3 C. Roasted cashews (optional)

Heat up 1 TBSP of oil on medium-high heat in a large skillet or wok. Add the garlic and fry until sizzling and beginning to brown.

Add half of the sauce (look out for splattering). Add the tofu, pepper and shallots. Cook for about 2 minutes, until slightly toasted and browned.

Add the eggplants and remaining sauce. Add the remaining oil and fry for about a minute. Lower the heat to medium-low and cover, cooking until the eggplants are tender but still not falling apart. If at any point the mixture seems too dry, add another tablespoon of water.

Take off the heat and add the cashews and basil, reserving a small amount of fresh basil for a garnish if desired. Sprinkle with the lime juice (to help keep the colour bright).

Saturday, June 27, 2015

New York Cheesecake with Cherry Topping


As a kid, my favourite cake was American-style cheesecake. I especially loved it when there was a fruity topping to contrast the tart, creamy cheese and slightly spiced graham cracker crust. I always thought it must be healthy (I was raised in a very pro-cheese household, and cream cheese was still kind of cheese)- at about ten years of age I was scandalized to find that was not the case. It's still delicious, though.

 I've long been cautious about making my own cheesecake, because of the price of the ingredients, but since organic cream cheese went on sale at my grocery store last week I decided it was time to attempt my dearly beloved dessert at home. I decided to use a sour cherry topping, because it's not only delicious but also covers up the brownness (and potentially, cracks) of the cake's top. I used homemade graham crackers to max out the homemadeness of this cake, as well as because I don't trust storebought graham crackers- had I been a bit lazier, I would've used good quality whole grain biscuits like digestive biscuits with cinnamon and sugar to taste.

Though I didn't use a water bath (I didn't have a container larger than my springform) the cake still didn't crack, to my great surprise and glee. It did get a bit too brown on top, but I just skimmed that layer off with a sharp knife and doused the whole thing in cherries anyways.

In any case, the cheesecake was a success. I made it for a get-together and it was wildly popular- later my family had some, and even those who normally only like the lighter European-style cheesecakes thought it was great. I think it comes down to the simplicity of the recipe, tasting fresh and bright, mainly consisting of cream cheese and high fat sour cream with no flour to thicken it. The lemon and vanilla add an extra bit of flavour without too many frills, so that the main centre of attention is still the tangy cheesy goodness.

It wasn't nearly as hard to make a good cheesecake as I previously thought- I hope that organic cream cheese goes on sale more often. One of the best parts of being an adult is having your favourite cake on demand (and one of the greatest tribulations is learning restraint...)

I didn't have time to take a picture of the cake when it was whole, but take that as a testament to its irresistability. Mmmm.


New York Cheesecake with Cherry Topping
Adapted from Moje Wypieki

For the Bottom:
100 g. Butter, melted
200 g. Graham crackers or digestive biscuits

Grind the graham crackers into crumbs using a food processor. Add the butter and blend until the mixture has the consistency of wet sand.

Press the mixture firmly onto the base of a 9" or 10" springform pan. If using a water bath, double-wrap the bottom of the springform securely in two layers of aluminium foil. Refrigerate 30 minutes.

For the Cheesecake:
750 g. Cream cheese, not reduced fat
180 g. Sour cream, 18% (I used 19%. A mixture of 14% sour cream and creme frâiche in a 3:1 ratio might also work well.)
220 g. Extrafine caster sugar
1 Tsp. Vanilla extract
Zest of 1 lemon
60 ml. Lemon juice
3 Eggs

Preheat the oven to 170℃.

Make sure that all the ingredients are about the same temperature to prevent lumpiness.

Blend all with a paddle attachment on medium-low until well-combined. Take care not to incorporate air into the mixture.

Pour onto the chilled base. If using a water bath, place the springform into a larger heatproof vessel and surround it with water. Bake for 75-90 minutes, until firm. Cover with aluminium foil if it is browning too quickly. Let cool gradually inside the oven, with its door wide open.

Refrigerate the cheesecake, without removing the springform or foil, overnight.

For the Topping:
1/2 Jar of sour cherries in light syrup, about 2 cups
2 TBSP Sugar
1 TBSP Cornstarch
Juice of 1/2 lemon
1/4 Tsp. Almond extract, optional

Mix the cornstarch and sugar. Dissolve in some of the light syrup from the cherries, then mix it back in with the rest. In a small saucepan, bring to a boil. Cook until thickened- the cloudiness of the starch will go away and the mixture will be translucent.

Let cool while stirring off heat. Add the lemon juice and Almond extract. Pour onto the cheesecake while still warm and refrigerate 30 minutes to set.


Thursday, June 25, 2015

Singapore Rice Noodles with Tofu


I'm not really that into take-out food... unless it's Indian. Or Thai. But I never understood the hubbub about Chinese take-out.

Maybe it's because the tastiest dishes are the ones with meat- I used to like the sweet-and-sour chicken balls, when I was a kid and didn't really question what was in them. But as a general rule of thumb, I'm not much one for fried rice and noodles, or vegetables and tofu doused in sweet and not particularly flavourful sauces. (I know that take-out by no means reflects Chinese cuisine accurately, even when the dish itself has real roots- it's got to be modified for the target customers, right? And it seems that in my area, blander is better.)


There are a couple of dishes I like, should I ever be handed a pamphlet and asked what I want to get- this is one of them. It's incredibly hard to screw up vermicelli fried in a simple sauce with vegetables and tofu, so it's always a safe bet.


When I tried this recipe for Singapore noodles, I was pleasantly surprised to find how similar they are to the take-out staple- only with a hint of British-style curry power (yum), a spice level to my taste, and a guarantee of not being cooked with any non-vegetarian stock. My noodles turned out quite brown because the only mushroom soya sauce I could find was the dark kind used to add colour to dishes. I also didn't have any cabbage on hand, so I included a double helping of bean sprouts.


Apparently, these noodles have no Singapore heritage at all- they're m0re of an amalgam of ingredients from regions of former British involvement, featuring that very vague "curry powder" I'd never use in an actual curry but that seems just right here. The only ingredient that may be tricky to find is the mushroom soya sauce, but you can always just use the regular kind.

This is also an incredibly easy recipe once you have the ingredients on hand, and it comes together quickly- that makes one more dish I won't have to order out for!

Singapore Noodles

From Veggie Belly

For the Sauce:
2 Tsp. Curry powder
1 Dried red bird pepper
3 TBSP Soya sauce
1 Tsp. Brown sugar
1/2 Tsp. Rice vinegar
1 TBSP Mushroom flavoured soya sauce
3 TBSP Water

Mix all together and set aside.


For the Noodles:

6 Oz. Rice vermicelli noodles
1 TBSP Vegetable oil
1 Tsp. Ginger paste
1 Tsp. Garlic paste, or 3 finely minced cloves
1 Carrot, cut into thin matchsticks
1 Red bell pepper, in thin slices
1 C. Bean sprouts
3 Scallions, chopped
1 C. Cubed fried tofu, or regular firm tofu fried in 2 TBSP oil until golden
1 1/2 C. Shredded cabbage (I used more bean sprouts)
1 TBSP Sesame oil
Lime and cilantro, to garnish

Soak the noodles in cold water for 5 minutes and drain. Set aside.

Fry the garlic and ginger in the vegetable oil in a large wok or skillet until browned, on medium heat. Add half of the sauce.
Once the sauce begins to bubble, add the tofu, carrot, pepper and cabbage/sprouts. Sauté for 2 minutes on medium-high heat.
Add the noodles and remaining sauce. Toss with a pair of tongs to coat in sauce.
Turn off the heat. Add the sprouts, scallions and sesame oil. Serve with lime wedges and chopped cilantro.

Tuesday, June 23, 2015

Pain Fendu

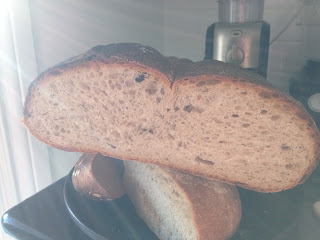
Here's a really nice sourdough loaf I made a while ago. It's light, porous, and flavourful- everything you'd want in a country-style bread to serve with cheese or as toast.

It also looks like a butt. Hah.

Look at that open crumb! I've made this bread twice in two weeks, and normally I'm all about trying something new. That's just how good this bread is. It's mostly made with plain wheat flour, along with a little bit of whole wheat and rye to build character. A thin wooden rod cleaves the loaf into two halves, giving it the distinctive shape of a bum (sorry, can't get over that) or maybe a coffee bean (if you're more mature than me).

This is the perfect bread for toast with butter and tomatoes (and perhaps salt and black pepper), the inaugural dish for the tomato season (in my humble opinion). Mine are still at least a couple of weeks away, but the first truly delicious tomatoes of the year arrived in the supermarket this week- a nice loaf of French country bread to mop up the juices is all the embellishment they need. Seriously, try this bread- no ifs, ands or butts.

Okay, I'll stop now. 

Pain Fendu
Adapted from Ketex.de

For the Sourdough:
75 g. Whole wheat flour
75 g. Water
7.5 g. Sourdough starter

Mix all and leave at room temperature, covered, for 16 hours.

Final Dough:
500 g. Bread flour
30 g. Dark rye flour
30 g. Whole wheat flour
340 g. Water
Sourdough
12 g. Salt
6 g. Fresh yeast, or 2 g. active dry yeast

In about 2 TBSP of the water, dissolve the yeast.

Mix the remaining water and the flour into a rough dough. Let rest 30 minutes.

Add the yeast, sourdough and salt. Knead until the dough is elastic and smooth, no longer sticking to the sides of the bowl.

Let the dough rise in a covered bowl for 90 minutes, stretching and folding ever 30 minutes.

On a floured surface, shape the dough into an oblong boule. Let rest 15 minutes. 

Use a long, thin, clean wooden or metal stick to press down in the middle of the loaf, dividing it into two halves without actually cleaving the dough. Let rest covered, with the stick still inside, for 2 1/2 hours. Preheat the oven to 250℃.

Remove the stick before baking. Bake for about 10 minutes on the lower shelf of the oven, spraying the inside of the oven with a spray bottle full of water to create steam at the very beginning (this gives a crispier crust). Open the door of the oven briefly to release steam. Then, reduce the temperature to 230℃ and bake for another 20-25 minutes, or until the bread is 190℉ inside when tested with a thermometer. Cover with aluminium foil if it browns too rapidly.

Let cool completely before cutting.

Monday, June 22, 2015

Coconut Cinnamon Evaporated Milk Buns


I should write a list of resolutions for baking. First and foremost would be checking on things more often so they don't burn. These buns barely escaped that fate with a deep brown tan.

Still, these babies came out successful. I made them mostly to use up the leftover evaporated milk from the gelato I made earlier. I also used cinnamon and coconut to make them a little more interesting. They flooded my house with the sugary, vaguely buttery smell of a Chinese bakery, though they're more toothsome than Asian-style bread. They've got a nice coconutty flavour and richness from the shredded coconut I added to the dough, softness from the evaporated milk, a slight caramel flavour without too much sweetness from the coconut sugar, and a hint of cinnamon to round it off. I sprinkled the top with coarse sugar to give it some crunch and additional flavour.

These are the kinds of sweet buns that can hold their own with some whole wheat flour substituted in- I'd also be interested as to how they'd taste with coconut milk instead of evaporated milk. I'd also like to try making the leftovers into a bread pudding or french toast, since it's firm enough that it won't fall apart when soaked with liquid.

Coconut Cinnamon Evaporated Milk Buns

Adapted from Roxana's Home Baking

For the Buns:

4 C. (490 g.) Bread flour
1/4 C. Lukewarm water
2 Tsp. Active dry yeast
2 Eggs, room temperature
50 g. Soft butter or margarine
1 Tsp. Salt
3/4 C. Evaporated milk
1/4 C. (50 g.) Coconut sugar, or brown sugar
1 Tsp. Cinnamon
1 Sachet vanilla sugar, or 2 Tsp. homemade
1/2 C. Shredded unsweetened coconut
Additional evaporated milk, raw cane sugar/coarse sugar, cinnamon and flaked coconut, to top

Mix 1/4 C. of the flour, the water, and the yeast to form a sponge. Let sit covered until spongey in appearance, about 30 minutes.


Mix the remaining flour, sugar, salt, cinnamon and vanilla sugar. In a separate small bowl, mix 1/4 C. of the evaporated milk with the coconut and let sit.


Add 1/3 of the flour mixture to the sponge. Mix it in using the dough hook attachment of a mixer on low speed, or use a silicone spatula by hand. Add 1/4 C. of the remaining evaporated milk and one egg. Once incorporated, add another 1/3 of the flour mixture, followed by the remaining evaporated milk and egg. Add the last of the flour mixture, followed by the coconut mixture and the butter/margarine. Knead 5 minutes on medium speed, or 15 minutes by hand, until elastic and smooth.


Let rise in a greased, covered bowl until doubled, 1-2 hours depending on the ambient temperature. Once doubled, punch down and form 12 equally sized balls. Let rise covered on a greased or parchment-lined baking tray (I used brioche molds greased with coconut oil) until almost doubled, 30 minutes to 1 hour.


Preheat the oven to 200℃. Brush the buns with evaporated milk. Sprinkle with flaked coconut, sugar and cinnamon.


Lower the oven temperature to 190℃. Bake for 25-30 minutes, until golden brown.


Sunday, June 21, 2015

Honey and Green Walnut Gelato

Recently I bought a jar of green walnut jam at my local Starsky- more like green walnuts in syrup, but still. I'd never tasted green walnuts, since I don't have access to a tree, so it piqued my curiosity. 
This is the brand I used- mind you, it wasn't empty before.
Green walnuts are simply unripe walnuts, and can be preserved in syrup, pickled, or even made into liqueurs such as nocino and liqueur de noix. The whole immature walnut is used, fleshy outside and all, cut into pieces if it's big. I'd love to try preserving my own, but I somehow suspect that the walnut trees in my neighbourhood are the more strongly flavoured black walnuts, so I'll have to do further research as to whether it's a good idea to use them (furthermore, I'd have to find a tree in a secluded enough place that nobody is questioning me picking the unripe nuts...).

'Till then, this jam made a lovely introduction to their flavour. They've got none of the taste you'd expect from walnuts, nor the texture- they seem more like giant raisins, only with a more floral, subtly nutty taste and some sourness from the syrup (which contains citric acid). The note of acidity helps keep the sweetness from becoming too cloying as well. It's kind of odd, but they kind of remind me of a sweet version of capers in that they make an interesting, hard to describe addition in terms of both texture and flavour. Seriously, I have no idea how else to explain these things. You've got to try them for yourself.

Anyways, I wanted to do something with the jam that'd take full advantage of its uniqueness and also allow me to stretch it a bit further (it ain't cheap!). I've been meaning to try making gelato for quite some time- the idea of a frozen desert that has a smooth texture without requiring eggs or vast quantities of cream is and was very appealing. I can't say this is a purist's recipe, given the powdered and evaporated milk, but it gives a very impressive result in terms of smooth, non-icy texture and rich taste. The ease of preparation and lack of a need to buy a new box of eggs is also a plus. I still kind of consider eggs and cream luxury products, since if I'm going to get them I'll only get the organic, free-range, top-notch ones, and those can get pricey. I've already gone through nearly two dozen eggs and a litre of cream (really) so I had to temper my ice-cream-making enthusiasm with something else.

I used a manuka honey from New Zealand that has a flavour just as unique as the green walnuts- it's kind of musty, but in a good way, and almost smokey along with the floral aroma. Honey goes with green walnuts just as well as it does with ripe ones, with the sweetness contrasting the tanginess of the green walnut jam and the subtler flavours complimenting one another. You can use any nice, light honey, but I wouldn't recommend anything too strong as it would compete too much with the green walnuts.

This is definitely not going to be the last gelato I make along this formula, since it works so beautifully. I'll want to make my own evaporated milk for next time, though... But that's an experiment for another day. 

Honey and Green Walnut Gelato
Adapted from Kochtopf

200 g. Whole milk
50 g. Evaporated milk
50 g. Powdered whole milk
1 TBSP Cornstarch
110 g. Light honey, preferably manuka
210 g. Whipping cream (35%)
150 g. Green walnut jam

Whisk together all but the whipping cream and green walnut jam. Pass through a strainer into a small saucepan, pushing through any clumps with a spatula to crush them. Bring to a rolling boil, then cook for about 2 minutes over medium heat, stirring constantly, until thickened. Take off the heat and keep stirring for another minute.

Pour into a cool bowl and refrigerate overnight. The next day, whip the cream and fold half of it into the cooked mixture. Fold in the other half. Spoon the mixture into an ice cream maker and operate according to the manufacturer's instructions.

In a freezer-safe tupperware container, spoon in about 1/3 of the gelato. Drizzle on 1/3 of the green walnut jam. Repeat this until all the gelato and jam is used. Put in the freezer immediately to firm up, and leave at least 6 hours (preferably overnight) before consuming.

Saturday, June 20, 2015

Spicy Szechuan Peanut Sauce


Few culinary feats are as satisfying for me as learning how to make something I'd only ever bought ready-made.

While I can't vouch for the authenticity of the "Szechuan" part of the sauce, I'm sure that this isn't far from the formulation used by the President's Choice sauce of the same name. It certainly tastes similar, only it's obviously fresher and a bit lighter on the ingredients list. My siblings love to douse anything and everything in the bought version, and they give this version a gold stamp of approval.

Articles to smother include roasted sweet potatoes, noodles (instant or nay), stir-fries (especially those with broccoli), tofu, dumplings, chicken nuggets (the soy versions or the real thing), et cetera. You can use it on things being grilled, baked, or broiled to make a kind of glaze, or use it as a dip.

If you like it hotter, add more chili pepper. You can also use either crunchy or regular peanut butter based on your preference (as far as I'm concerned, crunchy or bust). 

Spicy Szechuan Peanut Sauce
From Food.com

1 C. Peanut butter
1/4 C. Soy sauce
1/4 C. Sesame oil
3 TBSP Rice vinegar
2 TBSP Minced garlic, about 6 cloves
2 TBSP Grated ginger
1 Tsp. Red chili flakes
1 TBSP Hoisin sauce
2 TBSP Lime juice
3/4 C. Water
1/2 Tsp. Salt

Blend all in a blender until smooth. Pour into a container and keep for up to a week, or freeze leftovers in small batches for later use.

Friday, June 19, 2015

Southern Corn Cakes


Certain foods speak to you, you know? There's a kind of message you get from it just by tasting it. If this dish could speak, it would probably scream "IT'S FINALLY, FINALLY SUMMER IN CANADA! GET YOUR ARSE OUTSIDE AND ENJOY IT WHILE YOU CAN!"

Because sweetcorn is one of the great harbingers of warm weather. And while fritters and fried foods might usually be more suited for cold weather, these are packed with fresh, bright flavours that really do taste like summer. I modified this recipe quite a bit to suit what I had in the fridge, and added some red bell pepper bits and paprika for additional colour.


I myself was shocked at how good these were. Really, really, really good. These are the dangerous kinds of cakes I could easily eat all by myself, condemning my family to find their own dinner. But I didn't, obviously (mostly because I enjoy the deluge of compliments I get when I make something really good). If you have an abundance of fresh corn, this is a good way to highlight their raw flavour with just a bit of roasted goodness- they still taste fresh at the end. 

I served these with a bit of soy chorizo, creme frâiche, the spicy cilantro pesto I made yesterday, and some cherry tomatoes and lime wedges. As far as I'm concerned, those are the ideal condiments, each of the ingredients complimenting one another with spice, creaminess and zest. They'd also taste good with regular sour cream, salsa, crumbled feta, or whatever you have on hand to brighten them up. 

Southern Corn Cakes
From The Backyard Lemon Tree

3 Ears of corn, husked and desilked
1/2 C. Masa harina, or cornmeal
1/4 C. All purpose flour
3/4 C. breadcrumbs
1/4 C. Cilantro, chives, or a mixture
1 Tsp. Baking powder
1/2 Tsp. Baking soda
3 Eggs 
4 TBSP Buttermilk, or thinned down sour cream (my last-minute substitution, as I had no buttermilk!)
2 TBSP Olive oil
1 Tsp. Smoked paprika
1/4 Red bell pepper, diced finely (optional but very recommended) 
1/4 C. Shallots or red onions, diced finely
2 Cloves of garlic, minced
Salt and black pepper, to taste
Oil, to fry

Cut the kernels off the corn cobs with a sharp knife. Mix with the shallots, garlic, pepper and herbs. Set aside. 

Separately, whisk together the breadcrumbs, flour, masa harina, salt and pepper, baking soda, baking powder and paprika.

Beat together the eggs, buttermilk, and oil. Add the dry ingredients and mix until well incorporated with a wooden spoon. Add the corn and vegetables. Mix well to form a firm, pasty batter.

Heat a large skillet over medium heat and add some oil. Fry the corn cakes about two minutes, then flip with a spatula and cook another two minutes covered with a lid. Keep warm in an oven at about 80℃.


Thursday, June 18, 2015

Spicy Cilantro Pesto with Sunflower Seeds

It rained like crazy recently. That means my larger garden plants all had snapped stems, leaving me to gather any branches that lay in disarray in the dirt and clean them off. Some peonies, irises, chives, and... cilantro.

This is an incredibly simple recipe borne from the need to use up large amounts of herbs without needing to get any additional ingredients. Often I'll buy a bunch of herbs from the grocery store and only need a small amount, leaving the rest to a miserable fate in the bottom of the vegetable crisper.


Although a "real" pesto would be made with basil, pine nuts and parmesan, I hardly ever have those things on hand, and because they're relatively expensive, I don't make the authentic stuff very often. But a cheese-free, untraditional herb sauce is just as good, and is incredibly versatile to boot- add whatever odds and ends of leafy green herbs you've got. The only ingredient that isn't really a pantry staple besides the herbs is the lime, but you can just as well use a lemon or even a tiny bit of vinegar- it's mostly there to help keep the greens from oxidizing with acidity.

There is a commercially available pesto not too different from this one that I can't turn down in the winter, but now that my garden is overflowing with herby goodness, it'd be a travesty to buy what I can make in seconds flat using a handy dandy food processor. I love that thing.

This pesto tastes great on pasta (obviously), pizza, as a sandwich spread, along with grilled cheese, as a salad dressing when mixed with a bit more lime juice and oil, on roasted vegetables, in hummus... and so on. The only time you wouldn't like it is if you're one of those cilantro haters (I've always found that cilantro is one of those polarizing foods you either like or detest with a burning passion) or if you can't handle the heat. If you want, you can omit the pepper (at the expense of the "spicy" part of the name) or use a milder jalapeño.

The day will come when you've got more cilantro than you can handle. And when it comes, make this pesto and rejoice.

Spicy Cilantro Pesto with Sunflower Seeds
2 C. Chopped cilantro (stems and all), substitute some parsley if desired
1/2 C. Chopped chives or green onions
1/4 C. Roasted sunflower seeds
1 Red bird chili (fresh or dried)
1/4 Tsp. Each ground coriander and cumin
1/2 Tsp. Coriander seeds (optional)
Juice of 1/2 a small lime
4 Cloves of garlic
1/2 Tsp. Salt, or more to taste
1/2 C. Olive oil, or other good-tasting salad oil (such as camelina, pumpkinseed, etc.)

Blend all the ingredients, with only 1/4 C. of the oil, in a food processor. You could also use a pestle and mortar, if you have one large enough and enough free time. Once all the ingredients are pulverized into relatively small pieces, leaving a paste, fill a small container and top with the remaining oil.

Keep in the fridge for up to two weeks (but trust me, it won't last that long).


Wednesday, June 17, 2015

Wheat Berry and Puy Lentil Summertime Salad with Roasted Sweet Potatoes and Pepper Confetti


I've got that summertime, summertime salad...


I just wanted to try out my recent purchase of hard red wheat berries- I also wanted to make something that looked really pretty, because although many of the best dishes are incredibly homely, sometimes you just want a dish that's prettier than you. And has an insanely long name.

So, I made a salad. One of those very nutritious, colourful ones that sells for exorbitant amounts in tiny clamshell packages at your local chain health food store. But this is far from a difficult or expensive dish to make, consisting of mostly wheat berries and puy lentils with a bit of help from red onion, dried fruit and nuts, cilantro and arugula. Oh, and the roasted sweet potatoes and bell pepper confetti. But this is a summertime salad, so most of the ingredients are at the cheapest they'll be all year.

I made a simple vinaigrette with a little lemon-infused olive oil and apple cider vinegar to give some more fruity notes, along with dried oregano, powdered coriander (one of my favourite spices) and grainy mustard. The sweet potatoes and peppers are given a kick with the addition of spicy peanut sauce, which I had an almost finished bottle of in the fridge, but you can also skip the sauce entirely and add a bit of sesame oil and salt to finish them off. I think that next time I make this recipe, I'll try a chipotle-lime seasoning... or maybe something barbequey. The options are endless.

I really thought I'd be the only one to eat this thing, but it was surprisingly popular with my whole family. Even the non-salad people, and my lentil-hating kin, loved it. My sister even told me she wished I'd made more so we could eat it for days to come- not bad for something so nutritious. It really wouldn't hurt to make a big batch- you've got a lot of vitamins, protein, healthy fats and fibre going on along with the looks and taste.

So, summertime salad. I just wanted you to know, Baby, you're the best.

Enough Lana del Rey, then. Onto the recipe!

Wheat Berry and Puy Lentil Summertime Salad with Roasted Sweet Potatoes and Pepper Confetti

For the Sweet Potatoes and Peppers:
2 Small sweet potatoes, peeled and cut into 1-2 cm cubes
1/4 Of a red bell pepper, diced finely
1/4 Of a yellow bell pepper, diced finely
1/4 C. Peanut satay sauce, or spicy Szechuan peanut sauce
1/2 Tsp. salt
1 Tsp. Oil
1 Tsp. Sesame seeds

Preheat the oven to 200℃. Line a baking tray with aluminum foil, or use a baking dish. cover the bottom with the oil and add the sweet potatoes. Sprinkle with salt. Bake for about 10-15 minutes, until almost cooked through.

Add the pepper bits and pour on the satay sauce. Sprinkle with sesame seeds. Bake another 5-10 minutes, until completely tender and the peppers are a tiny bit charred.

Let cool before adding to the salad.

For the Vinaigrette:
1 TBSP. Apple cider vinegar
1 TBSP Lemon-infused olive oil (or, 1 TBSP regular olive oil plus 1 Tsp. lemon zest)
1 Tsp. German-style grainy mustard, or dijon mustard
1 Tsp. Dried oregano
1/2 Tsp. Powdered coriander
1/4 Tsp. Ground black pepper

Mix all in a small bowl.

To Finish:
1/2 C. Wheat berries
1/3 C. Puy lentils 
1/3 C. Dried cranberries
1/4 C. Golden raisins
1/4 C. Pecan pieces
2 TBSP. Roasted sunflower seeds
1/4 Of a large red onion, finely diced
2 Small sprigs of cilantro, roughly chopped (optional- parsley works too)
2 C. Arugula, preferably baby arugula (otherwise, cut it up into smaller pieces)

Cook the wheat berries in lightly salted water until tender, but still with a bit of bite. Drain and rinse with cold water. Do the same for the puy lentils- it should take them 15-20 minutes each to cook.

Let the wheat berries and lentils dry as much as possible, then pour into a bowl. Mix in the remaining ingredients, except for the cilantro and arugula. Add the vinaigrette, sweet potatoes and peppers. Add the cilantro and arugula just before serving to prevent sogginess (oil destroys the internal structure of raw leaves if you let them sit in it).