Translate

Showing posts with label bars. Show all posts

Sunday, January 8, 2017

Chewy Fudge Brownies sans Chocolate, Butter, and Leavening Agent...


I'm really amazed these brownies work. There's no chocolate, no butter, no melting together of the ingredients in a bain-marie... there's not even any leavening, but they work!

I love a fudgy, chewy, dense brownie. I also love recipes that require very little planning ahead to get the ingredients ready (at least, when I'm working with the limited storage space of my tiny apartment-kitchen rather than the spacious home-kitchen where I can comfortably keep a huge arsenal of rarely-used substances) so this was a very nice recipe for me to find.


I didn't use any chocolate chips and instead doubled up on walnuts, because I love walnuts in almost everything and didn't feel like going out to buy chocolate. I add a bit of Kahlua instead of coffee to the liquid components, which is not necessary but it's really hard to go wrong with a touch of booze in any baked good.


When you have a limited variety of ingredients and/or equipment, this is an amazing way to still get your brownie fix. One important note: since there's no butter contributing flavour, it's extra important to use good cocoa powder.

Chewy Fudge Brownies

Adapted from King Arthur Flour

2/3 C. Cocoa
1 1/4 C. Sugar, or 1 C. sugar and 1/4 C. brown sugar
1/2 C. Powder sugar
1 Tsp. Salt
1 C. All purpose flour
2 TBSP Instant coffee powder or 1 TBSP espresso powder (optional)
1-2 C. Walnut, pecan and/or chocolate pieces
1/2 C. Neutral flavoured oil (I used canola)
3 TBSP Kahlua (or strong coffee)
3 Tsp. Vanilla extract
3 Eggs

Preheat oven to 180℃. Grease and line an 8'' x 8'' pan with baking parchment.

Whisk together the eggs, oil and normal sugar until relatively smooth (sugar will still be grainy). Add Kahlua/coffee, vanilla, and instant coffee/espresso powder (if using).

Separately, sift or whisk together the flour, powder sugar, salt and cocoa. Add the liquid ingredients and mix until homogeneous with a large spoon. Add nuts and/or chocolate.

Pour into pan and spread evenly, and bake for 45-55 minutes. Remove and let cool at least an hour before removing from the pan and cutting.


Saturday, August 6, 2016

White Chocolate Blondies with Matcha Swirls


This recipe was really, really popular at my lab. I was surprised myself with how good they were- you don't even need to do the usual brownie/blondie-making step of dissolving the eggs in the butter over boiling water. Instead, you use a can of sweetened condensed milk to give a nice, chewy texture. I love white chocolate in almost everything, and this a great way to showcase the flavour of a high-quality white chocolate.

I added matcha powder in a pretty swirly-pattern on top so that there'd be a little bitterness to balance out the intense sweetness. You can also use earl grey tea, cocoa or expresso powder to the same effect. You can also just skip the swirl and top with some powdered sugar.


White Chocolate Blondies with Matcha Swirls
From Broma Bakery

115 g. (1/2 C.) Butter
1 C. White chocolate, chopped (or good quality chips or pieces)
1 Egg
1 Can (14 Oz.) Sweetened condensed milk
2-3 Tsp. Vanilla extract
1/2-1 Tsp. Salt
1 1/2 C. All purpose or pastry flour
1 Tsp. Matcha powder

Preheat oven to 180℃. Grease and line an 8"x 8" or 9"x13" pan with buttered baking parchment.

Melt the butter in a microwaveable bowl or in a bain-marie and add the white chocolate. Heat until both are dissolved.

Let cool until just warm when the side of the bowl is touched. Whisk in the egg, sweetened condensed milk, vanilla and salt.

Sift in the flour. Separate 1/4 of the batter and whisk in the matcha powder. Pour the plain batter into the pan first, then spoon 4-5 blobs of the matcha batter over the top and swirl with a fork, knife or chopstick until a nice swirly pattern forms.

Bake for 30-35 minutes, then remove and let cool at least 15 minutes before removing from the pan.

Friday, March 25, 2016

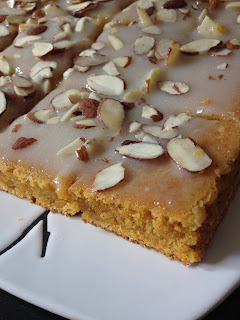
Carrot-Almond Squares for Easter


I love carrot cake, and it just seems right to have something with carrots for easter. But these squares are nothing like regular carrot cake, apart from the earthy taste of the carrots, moisture from the oil and mildly spiced flavour. Instead, these are more like blondies- almost fudgy because of how moist they are and not as light as a loaf or layer cake. I use almond extract and slivered almonds to complement the almond flour that helps contribute to the texture.

As an added plus, this recipe is really, really easy- even accounting for the sour cream glaze I made as a slightly tangy alternative to cream cheese frosting, it takes hardly any time to make and only really requires a couple of bowls. Perfect if, like me, you still have a lot of easter baking to get through.

Carrot-Almond Squares
Adapted from chefkoch.de

200 g. Grated carrots
125 g. Flour
125 g. Sugar
1 Tsp. Baking powder
Pinch of salt
1 Tsp. Cinnamon
1/4 Tsp. Cardamom
100 g. Ground almonds/almond flour
1/2 Tsp. Almond extract
125 ml. Oil
2 Eggs
1/2 C. Unskinned slivered almonds to decorate, if desired

Preheat oven to 180℃ and grease an 8"x8" pan well. 

Sift together dry ingredients. Mix with the remaining ingredients in a food processor or by hand until well combined. 

Bake for 20-30 minutes, or until a fork poked in comes out clean. Let cool before using a knife to cut around the edges and inverting the pan onto a plate to remove the cake.

For the Sour Cream Glaze:
2 TBSP Sour cream
2/3 C. Powder sugar
Drop each of vanilla extract and lemon juice

Blend all until thoroughly combined and pour onto cooled cake. Sprinkle on slivered almonds if using.

Sunday, March 13, 2016

Key Lime Pie Bars


I lost these pictures for a while amongst the other things I baked this summer- but I'm glad to find them again, because these are really delicious. I made them with what was left in the pantry just before departing on vacation as a gift for the family watching our cats, and they were extremely popular from the reviews I got.

You need very few ingredients to put these together, provided you can find key limes- but I think they'd probably be pretty good made with regular Persian limes (or maybe meyer lemons!) instead. Another garnish idea is toasted shredded coconut, seeing as coconut and lime go so well together.


Key Lime Pie Bars

Adapted from Brown Eyed Baker

For the Crust:

1- 1 1/4 C. Graham cracker crumbs
5 TBSP Butter, melted
2 TBSP Sugar

Mix all in a food processor until the consistency is that of wet sand. Pat onto the base and sides of a greased and parchment-lined 8"x8" baking tray. Bake for about 10 minutes, or until set firmly.

For the Filling:

1/2 C. Key lime juice
Zest of 6 key limes
4 Egg yolks
14 Oz. Sweetened condensed milk

Mix juice, zest and yolks with a whisk. Stir in milk and keep whisking until thickened. Pour onto the cooled crust and bake at 170℃ until set but still wobbly when poked, about 15-18 minutes.


For the Topping:

1 C. Sour cream
1/4 C. Powder sugar

Mix well and spread on top of the cooled bars.

Friday, January 15, 2016

Food For The Gods/Date and Walnut Bars


Since this was my year to take charge of Christmas baking almost singlehandedly, I decided to add a bunch of new sweets that weren't traditional in my family. I was especially eager to try out things that didn't come from Europe, so these Filipino bars fit the bill perfectly. They didn't require any expensive or rare ingredients, were fast and easy to make, and had some of my favourite ingredients- medjool dates and walnuts. I made a batch on the side of everything else, and was somewhat blown away.


I thought that they'd be good- but how good, I couldn't have guessed by the ingredients list alone. I thought that the dough sounded like a variation on the typical chocolate-chip cookie dough, but not so- the large amount  of brown sugar and small amount of flour, along with the butter and long, slow baking time, results in a chewy, soft, butterscotch-type bar that seems like an intermediate between candy and a blonde brownie. The walnuts were also slowly roasted because of the long low-temperature baking process, giving them an additional boost of flavour with no extra effort. Along with the moist, sweet tidbits of date, these bars have undoubtably earned their name and a permanent place on the Christmas cookie plate.

The dough would also probably go well with some other things, like pecans, shredded coconut, or chocolate. Because they're both so easy and so delicious, I'll be trying out variations year-round.

Food For The Gods
From Junblog

1 C. Flour
1 Tsp. Baking powder
1/4 Tsp. Salt
2 Eggs
1 1/2 C. Brown sugar
1 C. (227 g.) Butter, melted
1 C. Chopped walnuts
1 C. Chopped pitted dates (preferably medjool)
1 Tsp. Vanilla, optional

Preheat oven to 160℃. Grease a 9''x13'' pan, and line with buttered baking parchment. 

Mix dry ingredients with a whisk. Separately, mix the wet ingredients. Add the dry to the wet, along with the dates and walnuts, until well incorporated. Spread in pan and bake for 30-35 minutes.

Cut into small rectangles or squares with a sharp knife.

Sunday, July 12, 2015

Seven Layer Magic Cookie Bars


I made these over-the-top dessert bars with a bit of everything that I had left over in the pantry that was at risk of going stale- some graham crackers, nuts, coconut and chocolate chips. In fact, I think I might have gone overboard... the nuts had a hard time sticking to the bars because of how many toppings there were! I would definitely recommend sticking to the amounts in the recipe and not going nuts (literally and figuratively) like I did- chopping the nuts would have probably made them stick better, but I liked how the whole pecans looked.

They're loaded and tricky to cut, unless frozen for a bit, but definitely delicious. How can you go wrong with graham crackers, coconut, and loads of chocolate and nuts? You can add any kind of toppings you want, as long as you've got the seven that the name entitles. Graham crackers, coconut, sweetened condensed milk... the other four are up to you. I used white chocolate chips, dark chocolate chips, pecans, and walnuts (and a bit of flaked coconut as a garnish...). So, they're kind of eight layer bars in my case. Why not?


These bars keep well in the freezer, and don't need to be all thawed out for consumption- I like 'em chilled. These are best eaten with tea or coffee while catching up on old TV shows that everyone else has already seen, while complaining about shoddily introduced plot points. 

Just give them about half an hour at room temperature if you aren't so inclined to them cold. Whatever temperature they are, you'll be glad to have a few in the freezer for a quick bit of something sweet and rich.


Magic Seven Layer Cookie Bars
Adapted from Viet World Kitchen

120 g. (1 1/3 C.) Desiccated unsweetened coconut
180 g.  (8-10 sheets) Graham crackers
113 g. (1/2 C.) Butter, melted
1/2 Tsp. Salt
2 TBSP Sugar
1 C. Mixed chocolate chunks (dark, milk, white- should be at least half dark so it isn't too sweet)
1 C. Chopped nuts (pecans, walnuts, roasted almonds)
1/2 C. Flaked unsweetened coconut, optional
14-15 Oz. Sweetened condensed milk (One large can)

Preheat the oven to 180℃. Grease a 9"x13" pan and line with baking parchment.

Soak the coconut in boiling-hot water for 2 minutes and strain well in a sieve, squeezing out excess water. Mix with half of the salt and the sugar. Set aside.

Grind the graham crackers into crumbs with the remaining salt. Add the melted butter and mix well. Press onto the bottom and sides of the pan to form a crust.

Spread the coconut mixture evenly onto the crust. Add the chocolate chunks and nuts. Top with the sweetened condensed milk, and sprinkle on the flaked coconut (if using).

Bake for 30 minutes, covering with aluminium foil if it browns too quickly. Freeze for 15 minutes before cutting (refrigerating won't make it cold enough)

Wednesday, July 1, 2015

Nanaimo Bars for Canada Day

Happy Canada day!


Even if you aren't Canadian, it's the beginning of July, and thus high summer. That's enough reason to celebrate! Still, these bars are a Canadian classic worthy of making in honour of the land of maple syrup and a Tim Horton's on every corner. I've got plenty of beefs with my nation, but those definitely aren't it. 

I saw some pictures of Fourth-of-July themed Nanaimo bars on social media recently, and the irony wasn't lost on me. It seems a bit like making Independence Day clotted cream scones or something. Nah, for me these will always be iconic to Canada, no matter how far away I live from the West coast and the actual city of Nanaimo in British Columbia thereover. 

I've seen these being called New York Squares, but I guess sharing is caring... it wouldn't be fair to deprive the States of these delicious classics, but just remember that you've got Canada to thank for 'em!

As for the actual recipe writer in question, the city of Nanaimo (yes, these bars warrant mention on the official municipal website) traces them back to the early '50s, though the actual inventor is unknown. The earliest mention by name seems to be a recipe from a Nanaimo church-led compilation of housewives' recipes in 1957, where it is submitted strangely enough by an American... yet even before that, a very similar version under the name of London Fog Bars was published in a Vancouver newspaper in 1953, and appeared in a cookbook soon after. The recipe also popped up in New Brunswick, hence some people calling them New Brunswick bars (hey, as long as they're Canadian...)

I'll leave it to you to decide how much of that Wikipedia-gleaned information can be trusted. But as far as I'm concerned, I'm just glad that these delicious bars made their spread into nearly every corner of the nation. I first met them at Loblaw's as a kid, where I was right away smitten with the fusion of subtle toasty graham crumbs, nutty coconut and almonds, vanillaey custard icing and fudgy chocolate topping. I never would've guessed that something so good could be so easily replicated at home, but then again, this recipe was borne from the new '50s genre of easy, nearly instant recipes assembled from newly available commercial components. You don't even need to bake these bars, and most of the ingredients would likely have already been in a Canadian or American housewife's pantry. 

A somewhat neater-looking batch from a previous year.
For the modern baker, the only things that might be tricky to find are the custard powder and, in some places, graham crumbs. For the custard powder, I'd recommend replacing it with full fat powdered milk and a dash of vanilla extract, with some yellow food colouring or turmeric for the signature colour. You aren't missing out if you can't find graham crumbs- they're one of those things that gets excessively modified to stay unstale and nonrancid for months on shelves despite the whole wheat content. I used homemade graham crackers pulverized in a food processor, which I'd highly recommend- yes, making your own graham crackers is an extra step, but it's highly impressive to be able to tell people you made these completely for scratch. And you can keep the leftover crackers or crumbs for future baking in the freezer for several months. They aren't hard to make- I'll put up the recipe soon. You can also use digestive biscuits that have been processed to crumbs if those are available.

One last note- these bars are always  unrepentantly sweet, but a little less so than the originals since I reduced the sugar in the icing. That makes them a bit softer and more sensitive to warmth, but they still hold together nicely. If you want the real thing, add another half cup of powdered sugar to the icing and reduce the cream by a little less than two tablespoons- you can also skip the cream-beating step in that case. Cut these into small pieces if you like, a little goes a long way. Take a bite of chocolatey-custardey-coconutty goodness and think of the ol' Land of the Maple Leaf.

Nanaimo Bars
Adapted from the original Nanaimo bar recipe on the City of Nanaimo website
Makes about 18 bars, or 24 small ones

For the Base:
1/2 C Butter
1/4 C. Sugar
5 TBSP Cocoa
1 Egg
1 1/4 C. Graham cracker crumbs
1 C. Shredded unsweetened coconut
1/2 C. Slivered or flaked almonds
1/2 C. Walnut pieces, optional

Grease and line a 8"x8" or 9"x13" pan with baking parchment. Set aside.

Set a heatproof bowl over a pot of simmering water as a bain-marie. Melt the butter and mix in the sugar and cocoa, stirring until the sugar is dissolved. Quickly mix in the egg. Remove from heat and add the remaining ingredients.

Press the mixture into the greased and lined pan in a relatively even layer. Refrigerate until cool.

For the Icing:
1/2 C. Butter, softened
1 1/2 C. Powdered Sugar
2 TBSP Custard Powder
2 Tsp. Vanilla extract, optional
1/4 C. Whipping cream

Beat all of the ingredients together either on high speed in a mixer or in a food processor. If using the mixer, first use the whisk attachment to beat the cream with 2 TBSP of the sugar, then scrape it out and set it aside. Switch to a paddle attachment and cream everything else together, adding the whipped cream last and mixing it in until smooth.

Spread the icing over the cooled base layer with a knife or offset spatula in an even layer. Refrigerate until cold.

For the Topping:
8 Oz. Dark or semisweet chocolate
2 TBSP Butter

In a bain-marie set up as for the base, melt together the butter and chocolate until homogeneous. Take off the heat and let cool until not hot, but still relatively fluid. Spread onto the cold icing layer quickly to avoid the butter in it melting, then refrigerate the finished bars for at least 2 hours before cutting.

When cutting, use a warm knife (rinse it in hot water, then dry it, just before use).